How to deploy a custom OBO dashboard
Updated 2022 Workflow
We developed a completely automated variant of the Custom OBO Dashboard Workflow, which does not require any local installation.
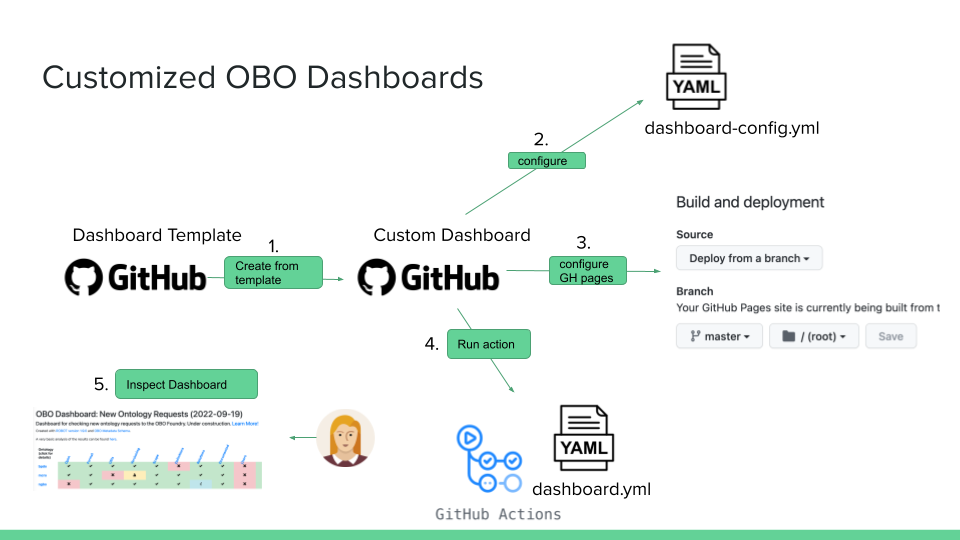
- Create a repository using the Dashboard template repository. (How to create a repository from a template)
- Modify the
dashboard-config.ymlfile, in particular theontologiessection:- Important: Add your ontology ID to the ID 'id' field
- Add the path to your ontology to the
mirror_fromfield.
- Optional: use the
profilesection to overwrite the custom robot report profile and add custom checks!
yaml
   profile:
     baseprofile: "https://raw.githubusercontent.com/ontodev/robot/master/robot-core/src/main/resources/report_profile.txt"
     custom:
       - "WARN\tfile:./sparql/missing_xrefs.sparql"
-
Click on
Settings>Pagesto configure theGitHub pages. Set theSourceto deploy from branch, andBranchto build frommain(ormasterif you are still using the old default) and/(root)as directory. HitSave.
-
Click on the
Actionstab in your repo. On the left, select theRun dashboardworkflow and click on theRun workflowbutton. This action will rebuild the dashboard and make a pull request with the changes. - Review and merge the pull request. Once it is merged, GitHub will automatically rebuild your dashboard website.
- After 5 minutes, click on "Settings" > "Pages" again. You should now a new section with information where your site is deployed:

- Click on
Visit siteand you should find your new shiny dashboard page!
Troubloushooting
Error on GitHub Action - Run dashboard section
Failed: make dashboard ROBOT_JAR=/tools/robot.jar ROBOT=robot -B with return code 2
There is a known bug at the moment requiring at least one ontology with a warning, error, info and pass, see https://github.com/OBOFoundry/OBO-Dashboard/issues/85.
- In your
dashboard-config.yml, add a temporary ontology we created to make this work. This is already in the Dashboard template repository.
ontologies:
  custom:
    - id: tmp
      mirror_from: "https://raw.githubusercontent.com/monarch-ebi-dev/robot_tests/master/custom-dashboard.owl"
Error on GitHub Action - Create Pull Request section
remote: Permission to <name of the user or organization>/<name of the repository>.git denied to github-actions[bot].
You need to update the workflow permission for the repository.
- Click on
Settings, thenActionson the left menu, thenGeneral. - Scroll down to the 'Workflow permissions section. Select the option 'Read and write permissions'. Save.
Error: GitHub Actions is not permitted to create or approve pull requests.
You need to enable GitHub Actions to create pull requests.
- Click on
Settings, thenActionson the left menu, thenGeneral. - Scroll down to the 'Workflow permissions section. Click on the 'Allow GitHub Actions to create and approve pull requests' checkbox.
2021 Edition
Contributed by @XinsongDu, edited by @matentzn
- Clone https://github.com/OBOFoundry/obo-nor.github.io and copy all its contents to a new GitHub repo under your account. Ensure that the
.gitignorefrom theobo-nor.github.iorepo is also copied to your new repo (it is frequently skipped or hidden from the user inFinderor when using thecpcommand) and push to everything to GitHub. - Pull the Ontology Development Kit from Docker Hub (can take a while):
- Modify the
dashboard-config.ymlfile, in particular theontologiessection: - Important: Add your ontology ID to the ID 'id' field
- Add the path to your ontology to the
mirror_fromfield. - Get the "base uri namespace" of the ontology using the following steps: a. Open the ontology in Protégé b. Select a class and press "command + u" (MacOS), the stem of the path would be the base URI namespace (e.g., in EDAM ontology, the base uri namespace is http://edamontology.org/, for Uberon it would be http://purl.obolibrary.org/obo/UBERON_)
- Add the base uri namespace to 'base_ns' field of your ontology in the dashboard-config.yml
- (As of October 2021 make sure there are multiple ontologies in the dashboard-config.yml, otherwise errors would be reported while running the code. There are currently some bugs in the dashboard code that require at least 2 or 3 ontologies in the list).
- In the Makefile uncomment the
#beforepip install networkx==2.6.2to ensure the correct network x version is installed. - Run
sh run-dash.sh(make sure dashboard folder is empty before running, e.g.rm -rf dashboard/*). - When run successfully, push all changes to GitHub.
- Go to GitHub repo you just created, and go to Settings, then Pages, and select your main/master branch as "source", and your root directory. You will see a website URL highlighted in green, where your OBO dashboard is deployed.